
Create a Webhook URL to subscribe to Amity real-time events with Node.js & send push notifications to iOS + Android devices & Web browsers
Push notifications is proven to be one of the best way to drive & increase user engagement with the platform and with Amity Social Cloud, a combination of products that can supercharges your platform with social features that can provide you with more than 50 Real-time events data for you to use to build a customize notification so your users can receive a very unique notification message like never before.
In order to subscribe to Amity Real-time events, you need to create a webhook URL that serves as a subscriber to receive all the events that are happening inside your Amity application e.g. when user like a post or when user comment on a post etc.
Prerequisites
This tutorial assumes that you have knowledge and experience with Javascript and Node.js framework. In addition, we’ll be using Heroku as our platform to build, run, and operate our Node.js application in the cloud (You can of course use other platforms to deploy the application to as well).
Create a Webhook Endpoint
First off, you have to create a POST endpoint with the name that is related to the service. In this case we’ll use ‘/asc/events’ as our endpoint name.
Once we add this webhook endpoint to Amity, this function will receives all the events that occur within your Amity application. The event data should be in the request body and we’ll use that data later on for push notification.
Deploy Node.js application to Heroku
Once we’ve finished with our Node.js application, it’s time to deploy it to Heroku to get a usable webhook URL. You can follow the link on the instruction of how to deploy your application to Heroku.
Once you’ve finished deploying your application to Heroku, you will receive a link for your application e.g. <span id="greylight" class="greylight">http://amity.herokuapp.com</span> in which you can add our endpoint name that we’ve set earlier in the application to get the full webhook URL e.g. <span id="greylight" class="greylight">http://amity.herokuapp.com/asc/event</span>
Add your Webhook URL to Amity Console
In order to receive Real-time events from Amity, you have to add your created webhook URL into the Amity Console first. So what you want to do first is
- Go to https://asc.amity.co and login with your credentials.

2. Navigate to Security -> Webhook section and click on Add new URL

3. Input your generated webhook URL and click Submit
Now you’ve successfully add webhook URL to Amity Social Cloud. You will now receive all the events. You can test this by making any actions with Amity SDK or API e.g. like a post or comment on a post. For now we can test this by adding Like reaction to a particular post which will trigger the didAddReaction event. After that you can open your Node.js application and run this command in your terminal.
<span id="greylight" class="greylight">heroku logs</span>
The terminal should output the Amit Real-time events log from our Like reaction earlier.
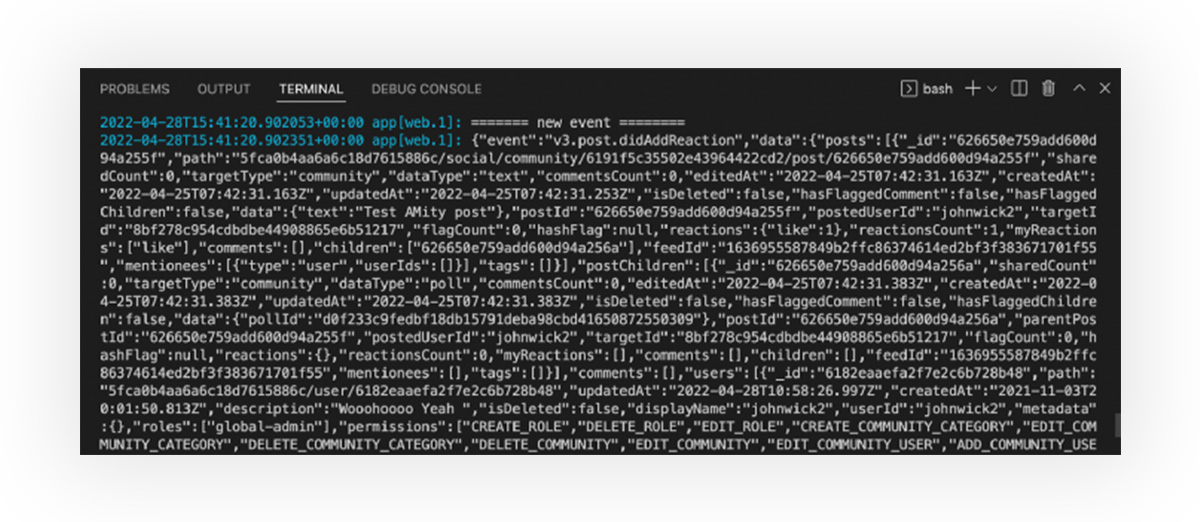
As you can see from the log, you have received a new event name v3.post.didAddReaction from Amity in which you can use the event field in the request body to differentiate events that you received.
Send push notification to iOS via APNs API
One of the benefits of having Amity Real-time events is that you can create a customize notification payload and send it to particular users. In order to do that first we’ll create a new Javascript file containing all the logic to call APNs API to send the push notification to iOS device.
Prerequisites
This tutorial assumes that you have knowledge and experience with generating a .p8 key and integrating Apple push notification service to your iOS application. If not then please refers to this tutorial on the benefits of the .p8 key file and how to generate it. Without further ado, let’s dive into the code.
Then you can modify your ‘/asc/event’ endpoint method to call sendiOSPushNoti function with Amity real-time event data as a parameter to build a customize notification payload.
After you’ve modified the code, you can deploy your application to Heroku and test it again whether it’s Add reaction or comment on a post etc. and see the response from the APNs API in the application’s terminal ( Don’t forget to commit your changes first before deploying to Heroku).
Send push notification to Android via Firebase Cloud Messaging (FCM)
For this section, we’ll create a new Javascript file containing all the logic to call FCM to send the push notification to Android device.
Prerequisites
This tutorial assumes that you have knowledge and experience with Firebase and how to create Firebase projects.
Required npm packages:
- firebase-admin
- googleapis
- axios
You can install above packages to your current Node.js application with the single command line below.
<span id="greylight" class="greylight">npm install --save firebase-admin googleapis axios</span>
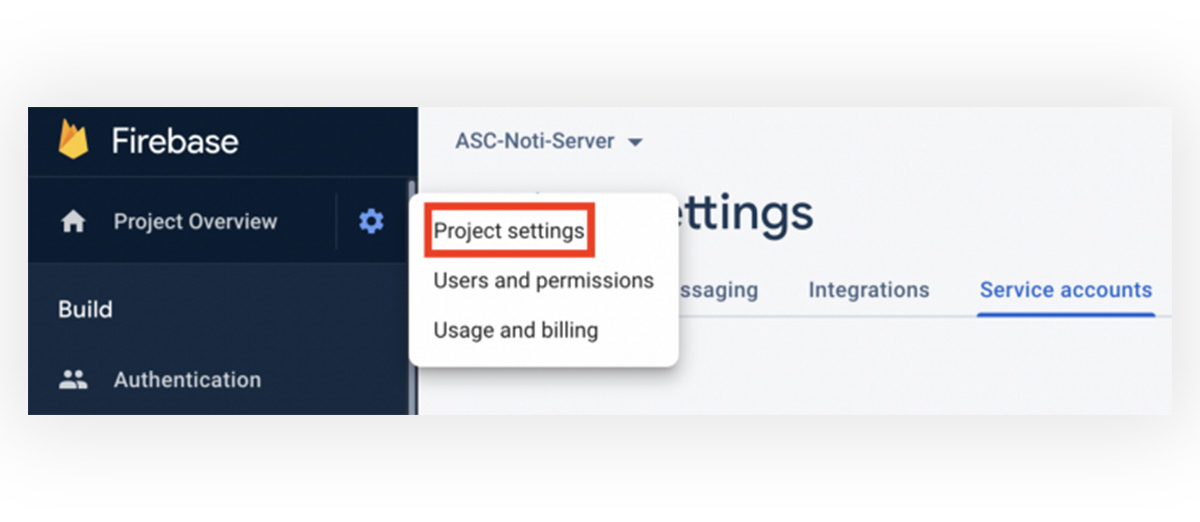
Now go to your Firebase project and navigate to “Project settings” menu.
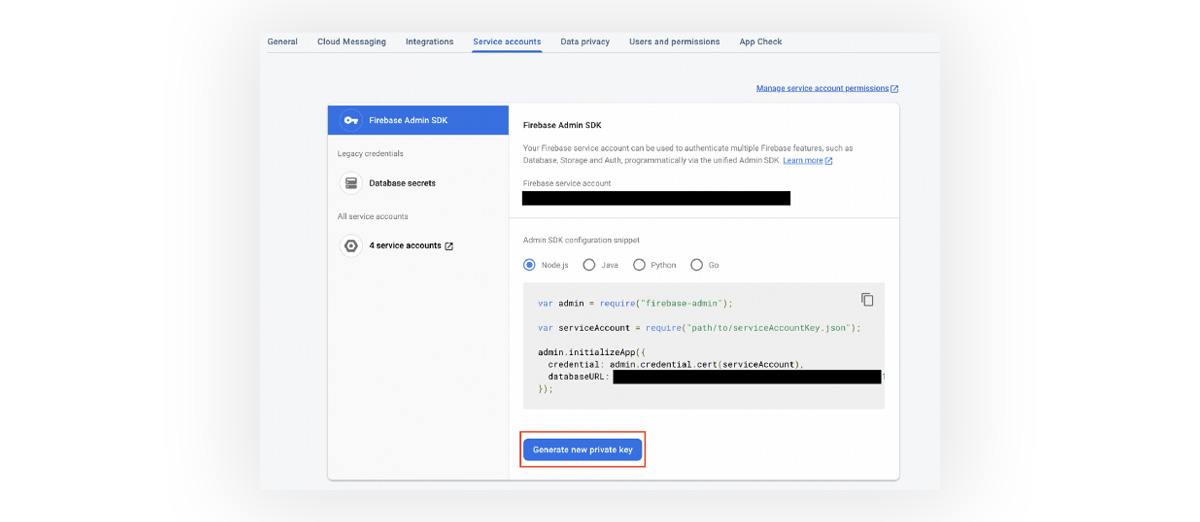
After that, click on the “Service accounts” and then click on the “Firebase Admin SDK” and click on “Generate new private key” button which will download the json file into your device.
Then, copy the downloaded JSON file into the root of the Node.js project and create a new FCM Javascript file in which we’ll add all the logic to call FCM to send the push notification to Android device (and website as well). Add the script below to the new Javascript file.
Then you can modify your ‘/asc/event’ endpoint method to call sendAndroidPushNoti function with Amity real-time event data as a parameter to build a customize notification payload.
After you’ve modified the code, you can deploy your application to Heroku and test it again whether it’s Add reaction or comment on a post etc. and see the response from the FCM API in the application’s terminal ( Don’t forget to commit your changes first before deploying to Heroku)
Send push notification to Web Browser
For this section, we’ll be reusing FCM Javascript file which contains all the logic to call FCM to send the push notification to web browser from our Node.js Application.
Prerequisites
This tutorial assumes that you have knowledge and experience with Firebase and how to create Firebase projects.
Update your website HTML to generate FCM device token
You can add the code below to your website to generate a deviceToken that will be used for FCM web push notification.
After you’ve received the web device token, you can add it to the deviceToken variable in your existing FCM javascript file (That you’ve used with Android push notification earlier). Please make sure that your user allow push notification in the browser as well otherwise the push notification won’t go through.

I hope that this tutorial helps you get closer to your goal in building an amazing Social experience! we can’t wait to see the amazing platforms that you guys will built with our products.
Also, this use case is just the tip of the iceberg! You can use Amity Real-time events with other use cases as well such as Analytics! which can really help giving you a much more in-depth insights on your platform.
If you’re interested to learn more about Amity and what we offers, you can take a look at our website or you can contact us here at our contact page. Looking forward to talk to you soon!